FDM Infill Demystified: Choosing the Right Percentage and Pattern for Your 3D Prints
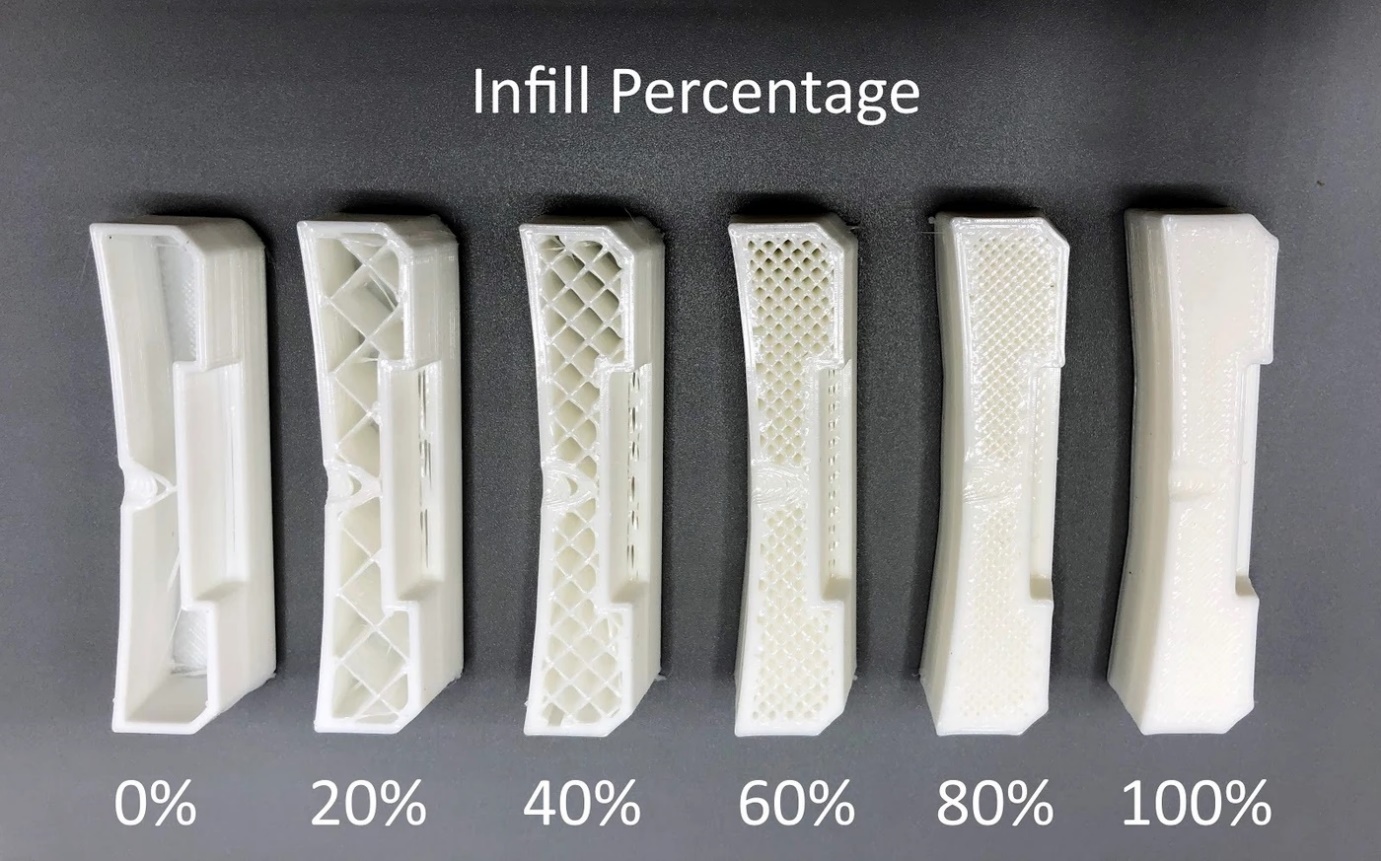
If you've ever commissioned a 3D printed part and been asked what infill you want—don't worry, you're not alone. For many small businesses and hobbyists in Singapore, infill is one of the most misunderstood but impactful elements of a 3D print. Done right, it can save you time, money, and material. Done wrong, it can result in a part that's too weak—or just plain over-engineered.
In this post, we'll walk you through what infill is, when different infill settings make sense, and how our FDM design team uses infill patterns and percentages to balance cost, speed, and strength for your specific project needs.
What is Infill in FDM Printing?
Infill refers to the internal structure of a 3D print—the material that fills the space between the outer walls (perimeters). In FDM printing, this structure is generated automatically in your slicer software.
Infill isn't solid unless you ask for it. By default, it's a geometric pattern printed at a certain density (usually between 10% and 40%), allowing you to save on material without sacrificing too much strength.
Fun Fact: The difference in print time between 20% and 100% infill can be 2x or more—even for a small part!
Choosing the Right Infill Percentage
Different applications call for different infill percentages. Here's a general guide we use when helping customers choose the right setting:
| Infill % | When to Use | Notes |
|---|---|---|
| 10–15% | Display models, prototypes, cosmetic parts | Very fast and light; not for load-bearing use |
| 20–30% | Functional parts with moderate stress | Our most commonly used range |
| 40–60% | Mechanical parts with repeated use | Adds durability without extreme material cost |
| 80–100% | High-load parts, fixtures, tools, taps, threads | Use only when absolutely necessary—diminishing returns apply |
For example, a tool handle might be fine at 40%, but a tapping block or load-bearing gear may require 100%.
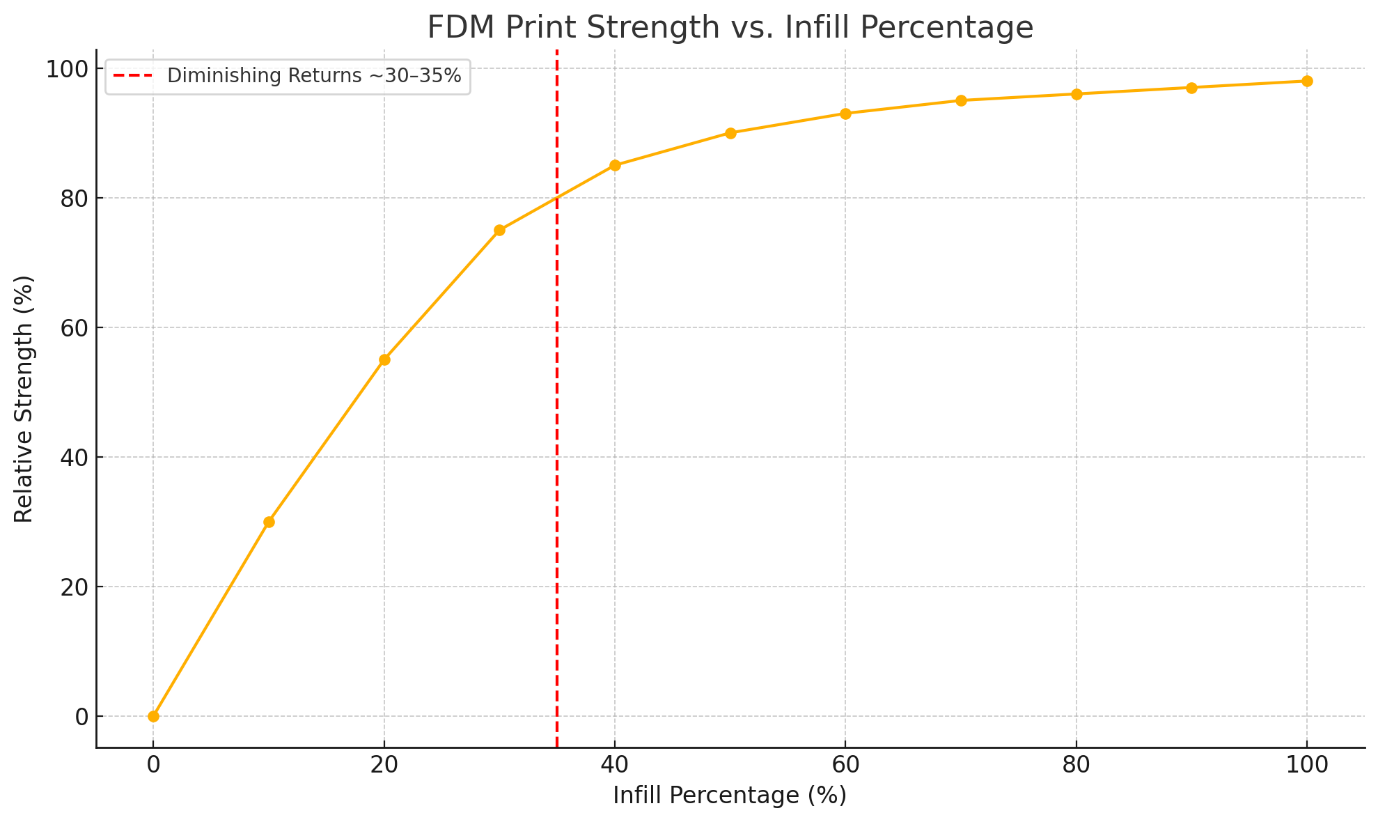
Diminishing Returns: Once you go above 35%, each additional % adds more material and time—but with sharply diminishing returns in strength. That's why we often recommend 30–40% for high-use parts unless a specific requirement calls for more.
What Infill Pattern Should You Choose?
Most slicing programmes offer several patterns, each optimised for different use cases. Here's what we typically use in the studio:
- Grid — Fast and easy to print. Good for general use.
- Gyroid — Strong in all directions and efficient. Great for structural or load-bearing parts.
- Rectilinear — Simple and fast, ideal for prototypes or cosmetic models.
- Honeycomb — Balanced strength and efficiency. Good for parts with high compression.
- Cubic — Excellent 3D strength. Great for vertical loads and mechanical parts.
Tip: For functional mechanical parts, we often default to Gyroid at 30–40%, or Cubic when extra strength is needed vertically.
One customer commissioned a clamp bracket for a testing jig. With 40% cubic infill and PETG, it withstood months of daily use without visible wear.
When Does 100% Infill Make Sense?
While it's tempting to request a "solid" part for strength, 100% infill isn't usually needed—and can make your project more expensive and slower to produce.
Here's when we do recommend it—including for water-tight or water-resistant applications:
- Threaded or tapped holes that need high integrity
- Precision jigs, cutting fixtures, or gauges
- Thin parts that must not flex or deform
- When the part must be machined or post-processed heavily
- When water resistance is required—dense infill combined with proper wall thickness and shell settings can help reduce permeability
For a customer needing drill guides for metalworking, we printed the parts in ABS with 100% infill to withstand both the drill bit pressure and clamping force.
Our Approach to Infill: Balanced, Local, Practical
As a local 3D design and print studio, we help our clients in Singapore make smart choices that match their use case and budget. When you send us a project brief or sketch, we:
- Review expected use cases (e.g., load-bearing, impact, display only)
- Recommend infill patterns and density accordingly
- Customise perimeters, shell thickness, and materials for optimal results
We've seen that combining the right infill + orientation + material can improve part strength more than just cranking up the infill alone.
Need Help with a Mechanical Part?
Whether you need a functional bracket, housing, tool, or fixture—we can help you design and print it properly the first time.
Contact us today to get expert advice on infill settings and more. We use advanced CAD tools and professional slicing workflows to design smarter, print faster, and deliver high-quality results every time.